My 6-year old son and my 9-year old daughter had the opportunity to try out the Science4Us.com Online Subscription by Science4Us.com.
WHAT IS IT?:
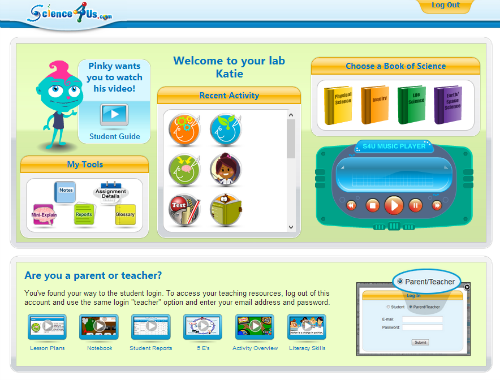
Science4Us.com offers an interactive science curriculum for teachers and students in grades K-2, and it can also be used for review of core science topics for older students in grades 3-5. Students can explore a variety of science topics in Physical Science (matter, energy, force & motion), Inquiry (science tools), Life Science (living things, balance in nature), and Earth/Space (earth, space). There are a number of subcategories in each topic area for students to learn.
The subscription offers access to over 350 animated activities, games, printable worksheets and activities, and hands-on projects so that students stay engaged and expand their learning while they enjoy what the site has to offer.
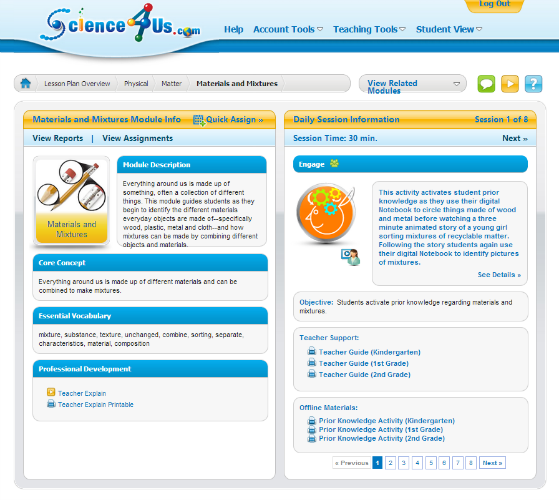
This curriculum is entirely web-based, so you can take it on-the-go and use it anywhere that you have access to the internet. Students can explore on their own, or you can take advantage of the comprehensive lesson plans provided in the teacher’s area to get the most of the content that’s offered. The time requirements and suggested sequence of activities is all laid out for you, so it’s easy to pick up and go at any time!
You can also access your students’ automated progress reports and see how they scored, what they’ve worked on, and how much time they’ve devoted to the activities.
Science4Us offers a variety of topics for your kids to explore. There are 28 modules in 4 disciplines to include:
- Earth/Space
- Earth
- History of Earth
- Materials
- Features
- Weather

- Space
- Exploring the universe
- Earth in space
- Earth
- Life Science
- Living Things
- Living & non-living
- Plants
- Animals
- Balance in Nature
- Food webs
- Habitats
- Eco awareness
- Living Things
- Inquiry
- Science Skills
- Science tools
- Science Skills
- Physical Science
- Matter
- Materials & mixtures
- Observing matter
- States of matter
- Changes in matter
- Energy
- Energy sources
- Light energy
- Heat energy
- Sound energy
- Electrical energy
- Energy transformations
- Force & Motion
- Location & perspective
- Motion
- Force
- Magnets
- Simple machines
- Matter
An annual subscription is available for just $7.95/month per child.
You can even enjoy a no-risk, 2-week money-back guarantee! If it is not a fit for your child, cancel within the first two weeks and receive a full refund. You can also watch some demos and see what you think.
There is no commitment, so you can cancel at any time. This is another great product from the creators of VocabularySpellingCity.com!
OUR EXPERIENCE:
Holden is in Kindergarten, so this material is right on target for him. Haylee is in 4th grade, so we used this material as a good review for her. Actually, I’ve noticed some gaps in her science knowledge in the past, like when questions about simple machines came up on her standardized testing one year, and I realized we had not explored that in depth before. So with that in mind, I thought this program would actually be great for filling in some of those gaps in past concepts for her in a fun and engaging way, and we were not disappointed!
There are couple of different ways you can use your subscription. If you wish to be completely hands-off and just let your kids explore the material independently as a supplement, you could certainly do that. I let my kids use the site that way for a while so they could just get a feel for how to use the site and what kinds of lessons and games were available. They really enjoyed using the site in that manner. They could do an entire module with each of its eight online activities plus a handful of games in one sitting when they used it like that. But really, this site has so much more to offer! By using it as a complete curriculum, there’s so much material there that you could complete one module over a period of 2 weeks, working 4 days/week. Or if you prefer block scheduling, you could literally spend an entire day working your way through one module. Sometimes that works well for us because we use a 4-day schedule for our Sonlight core and then have Fridays free for other activities or to focus on something specific. Whichever way you choose, there’s plenty of material here to keep your kids busy and learning about science. Let me explain just how it works when you use Science4Us.com as a complete science curriculum.
With your subscription, you receive two different log-ins…one for you as the teacher so you can access all of the wonderful lesson plans, offline activities, and printable materials, plus all of the student progress and assignment features…and one for each of your students to access just the student online activities. So this is what I want to present to you today…the full curriculum method… so you can see just how much this site has to offer. I think the best way to show you that is to take you through one whole module and explain the steps to you. So for this purpose, I’m going to demonstrate how we completed the Magnets module.
First, I accessed the teacher area and assigned the module to each of them so it would show up under their assignments when they each logged in. Then I went ahead and printed out all of my teacher’s guides and printable activity instructions and offline worksheets my kids would be using. These are broken out by grade level for K, 1st, or 2nd grades. I took my kids through the same module simultaneously using the K and 2nd grade material as appropriate for each of them. That way, I only had to teach the lesson once with minor variations for the two of them, and they could work on their separate offline activities at the same time on their own level.
I had the kids sit side-by-side with their laptops to begin. First, they completed the Engage online activity. They had to show their prior knowledge by drawing or writing about something in their on-screen science notebook that they thought was magnetic. Then they watched a video about different kinds of magnets being used in real life activities, like this giant ring magnet picking up junk. This section ended with some “think about it” types of questions, and then they both received a star on the activity for completing it.
Now it was time for the coordinating offline activities. Here, you can see the teacher’s guides, instructions for offline activities, and worksheets that were available to accompany this section of the lesson.
After discussing the material in the guide, the kids worked on their leveled worksheets. Both of the them had to draw a magnetic object being attracted by a magnet and write about it underneath. They were also given KWL charts, which are used throughout the module. They begin by recording what they already know about the topic of magnets, then add what they would like to know, and later add what they learned after completing the entire module. It had a bit more detail regarding evidence for the 2nd grade level, but it was otherwise the same as the K level.
What I’ve just described represents the amount of work you would complete for one day’s lesson if you were completing a module over 2 weeks (8 school days). I felt it was just about right for a daily lesson.
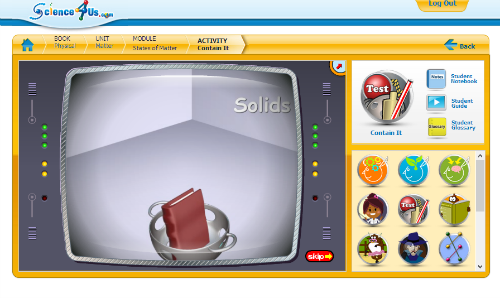
Then we moved on to the next section called Explore. In this online activity, they had to click and drag various objects on the screen over to the target area to see whether or not they would be attracted to the magnet.
Then it was time to work through the offline materials. Here are the Teacher’s Guides, activity instructions, and offline worksheets that were available for both of their levels in this section.
I gave them each a magnet and a few small objects, and they had to fill out their worksheets with information about whether or not the magnet was able to move the objects. They had to think of other objects that would and would not be moved by the magnet and draw some pictures of the items that were and were not affected. Haylee also had to record what surprised her and explain why it was different from what she’d expected.
This concluded the lesson for day 2 of this module.
Next, we moved on to the Explain section. They watched a video that explained the parts of the magnet, the behavior of the poles, and the various shapes that magnets can be. They had to answer some interactive questions on the screen to demonstrate their understanding of the concepts.
Here are the printed materials to accompany this section. As a group, we discussed the use of magnets, how they work, and the shapes they can have.
Then they got to do a hands-on experiment to see how magnets make objects move if they are magnetic. I gave them each a magnet and a variety of items to investigate for magnetism, including paper clips, key chains/keys, nuts, bolts, paper, plastic, cloth, and coins. Holden’s worksheet asked him to choose five of the objects and make predictions about their magnetism, offering evidence of why he’d drawn that conclusion. Then he had to record in a chart which objects were or were not magnetic and answer a few questions about that. Haylee’s worksheet had the same activities, only she had to choose eight objects to investigate.
When they watched the video, they learned that the round ring magnets will repel each other if you slide them down a post. So when they finished their experiment, they asked if they could try this for themselves. I discovered I had several ring magnets in my supplies, so I let them give it a whirl with a pencil that had a big eraser on the end as the post. It was a big hit! They laughed about how funny it was watching the magnets bounce up and down but never touch. Lots of fun!
This concludes their work for day 3 of the module.
The next lesson was the Elaborate: Silly Bulls section. Here, the kids got to work on several of the online activities. First, they watched a funny video introduction to a game that made a pun on “syllables” by bringing out dancing “silly bulls” in tutus. The kids got a good laugh out of that one! This syllable activity gave the kids a vocabulary word, explained its meaning, and then asked them to drag the individual syllables of the word into the blanks in the correct order to form the words.
Next, they got to play a few games. The first one was called “Alphabetize.” They were given related vocabulary words in a scrambled list, and they had to drag the words onto the virtual paper on the other side of the screen and drop them in alphabetical order. Holden has been practicing this skill a lot in his phonics studies, so I was pleased to see he did this activity perfectly!
The next game was called “Mix and Match.” Oh, my goodness! We were ALL totally addicted to this game! Th
When the game begins, your screen is split down the middle, and you have to separate moving objects through a hole in your divider so that they become sorted by whether they are metal and non-metal. That might sound easy at first, but you have to complete the task before the timer runs out! And sometimes, multiple objects are bouncing around the screen on top of each other, so it’s easy to let more than one pass through your opening at one time, even when they belong in two different categories! This was actually very challenging, and each level adds more and more items to be sorted in the same amount of time.
Here are the printable guides and activities that went along with this portion of the lesson. The teacher’s guide explained the reasoning behind the Silly Bulls game, and then it summarized the vocabulary terms and their meanings. I read those aloud to the kids for review. Then we moved on to the activities.
Holden’s activity, called “Fly Swatter,” was so much fun that Haylee ended up joining in, too! I wrote all of the vocabulary words on large dry-erase sentence strips and spread them out of the floor. I left them all spread out for Haylee but modified it slightly for Holden by grouping them into multiple choice sections to narrow down how much he had to read at once in order to answer a question. As a beginning reader, that worked well for him. I then read aloud a definition of one of the words, and they each had to use the fly swatter to swat the correct vocabulary word for that meaning.
Haylee’s activity was called “Sentence Unscramble.” We cut up a bunch of sentence fragments from the worksheet and laid them out on the bar. I suggested that she sort them by beginning phrases, middle phrases, and ending phrases so they would be easier to put together into complete sentences. Then she slid the fragments into the correct places to make true and complete statements. She thought that was fun, too!
This concluded the material for Day 4 of the module.
Next, they worked on the online activity for the Elaborate: Sticky Stuff section. They viewed a video of a story book about sticky stuff. It explained the difference between things that literally stick to people versus the “sticking” that happens between magnetic objects.
Here are the printable guides and materials for this section. There was a printed version of the story they’d watched on the screen, which I read aloud again to refresh their understanding. Then the activity had them answering literature questions about the book, such as who the author and illustrator were and what their contributions were to the book. Then there were some magnet-related questions from the story and a question about the main idea.
Another printable activity was about cause and effect. We discussed the meanings of cause and effect, and they the kids each had a worksheet to demonstrate the concept. Holden had to draw pictures to show what would happen if you held a magnet near each of the listed objects, as well as pictures to show how the like or opposite poles would react to one another. Haylee had to answer some questions about cause and effect relationships that were demonstrated in the story, and then she had a T-chart with various magnet-related causes where she had to fill in the missing effects.
This concluded the work for Day 5 of the module.
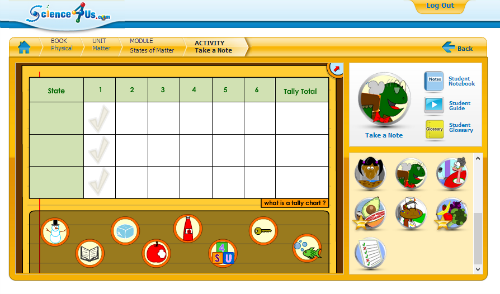
The next lesson was called Elaborate: Take a Note. Here, they were given a STEM activity. We decided we had already tested the magnetism of a whole range of objects enough to understand the concept, so we just discussed the questions and answers orally as a group for review.
In addition, it had us use the results of our magnetism tests to create both a tally chart and a bar graph. Then we used those to evaluate the results and to draw conclusions about the benefits of using these methods to record data.
I happened to have a blank dry erase chart, so we used that to demonstrate both types of charts. Then we moved on to the online activities that helped us practice the magnetism concepts.
The first online activity we did in this lesson was called “Magnetic Monday.” In this activity, the kids had to correctly identify the various types of magnets that were being described. Then they had to guess how many sheets of paper different types of magnets could hold on a refrigerator. That was a neat way for the kids to make a practical application using their knowledge of magnets.
The next activity was called “Magnetic or Not.” In this activity, you must drag each item on the screen over to the target and see whether or not it is attracted to the magnet. If it is, you then drop that item into a box labeled for magnetic items. If it’s not, then you drop that item into a box labeled for non-magnetic items. It’s a simple sorting game that reinforces the concept of what kinds of items are magnetic.
The last activity was called “Which is Which?” This is played like a game show with a penguin for a host. It gives them quiz questions that check their understanding of the concepts they’ve learned in this module. In this case, they had to identify which magnet illustrations demonstrated pushing, pulling, attraction, or repulsion. Since most of the illustrations looked the same for each question, it could have been a little tricky for a six-year old to have to think through, but Holden did great with it!
This concluded the Day 6 lesson.
The next lesson was called Elaborate: Investigation. The kids explored the “Investiga
These are the printable guides and activities available in the teacher’s section for this module. I gave the kids a data chart that listed a variety of objects and indicated the maximum distance at which they were drawn to a magnet. Then they verbally answered questions about the data, requiring them to properly analyze and explain the information provided in the chart and draw appropriate conclusions based upon it.
Then we worked on the offline worksheets. Holden worked on an activity called “Come Here! Go Away!” that allowed him to demonstrate how the poles of two magnets attract or repel each other. Haylee worked on an activity called “Make a Magnet.” She got to learn how to magnetize a nail and a pair of scissors using a bar magnet. She had fun with that one!
This concluded Day 7 of the module.
The final lesson was called Evaluate. This provided review and assessment of the whole module. There were a number of components available for this lesson. We printed out a review guide, which provided us with lots of discussion questions and supporting details that had been presented throughout the module, and we went over them together. The review guide told us which online and offline activities could be used to review the concepts if needed.
Once we covered that, the kids went to the site and took the online assessment called “Evaluate.” Haylee got everything right, and Holden accidentally clicked when we were reading a couple of the questions, but still did well. So to be extra sure they understood everything, I decided to use the optional printable assessment, as well.
The teacher’s guide explained how to evaluate the online assessment, and it explained that for remediation, you should offer the student the chance to take the online assessment a second time. The site will record both grades for your comparison and later reference. It also suggested that the offline assessment could be used as an alternate evaluation. I went ahead and had them both take the paper assessments, and they both got 100%!
This concluded day 8 of the module.
Once we were all done, Haylee commented to me that she really had fun doing the complete curriculum approach and enjoyed all of the hands-on activities and worksheets that went along with the online activities. She said she would like to do it that way again some time! I asked both kids which way they preferred using Science4Us.com…just working through the online activities on their own or doing the full version, and they both said they liked the full version better with all of the hands-on activities. Who knew? With such tech-savvy kids, I was a little bit surprised that they didn’t just want to play on the site.
I have to say that overall, I’m very impressed with this program. The lesson plans are all laid out for you as the teacher, and all of the printable materials and hands-on activities really added a tremendous value to the already fun online activities the site has to offer. I felt the material did a great job of reinforcing the concepts being taught, and I liked the cross-curricular applications, as well. I also like being able to log in to the teacher’s area and view their progress when they’re working on some of the online activities independently. But mostly, we enjoyed taking advantage of the complete curriculum program the site provides. It’s bright and colorful, funny and entertaining, and it had just the right amount of fun balanced with real learning to really drive home the concepts in a memorable way for the students. My kids really, truly enjoyed it! And I really loved that I could take a module and work with both of my students who are four grade levels apart and work with them simultaneously on their level with the same material. I know the concepts are mostly review for my 4th grader, but I’m not sure the concepts were taught in such a memorable way for my daughter when we covered them in the past, so I still see a real benefit for her, too. Everything was so much fun for Holden, and I could see him really learning so much.
At just $7.95/month per child, I can’t think of any reason you wouldn’t want to give Science4Us.com a try! I would definitely recommend it.
Check out what other Crew members had to say about this awesome science curriculum by clicking the banner below.
********************


Nice review! Very well done! I love how you did a complete module and the wonderful pictures! The fly swatter game looks like fun!
ReplyDeleteThanks for the feedback! My kids absolutely loved this subscription, and I hope that is evident in the pictures by how hard they were working on it!
Delete